Yay! FiGBUS is hitting the road and heading off to Chicago at the end of this month for the Radiological Society of North America’s Annual Conference. All the major medical imaging vendors exhibit and launch all their latest hardware and equipment at the RSNA each year so we’re hoping to bring you some exciting new ultrasound equipment updates from the exhibition floor. Watch this space.
Tag Archives: bedside ultrasound
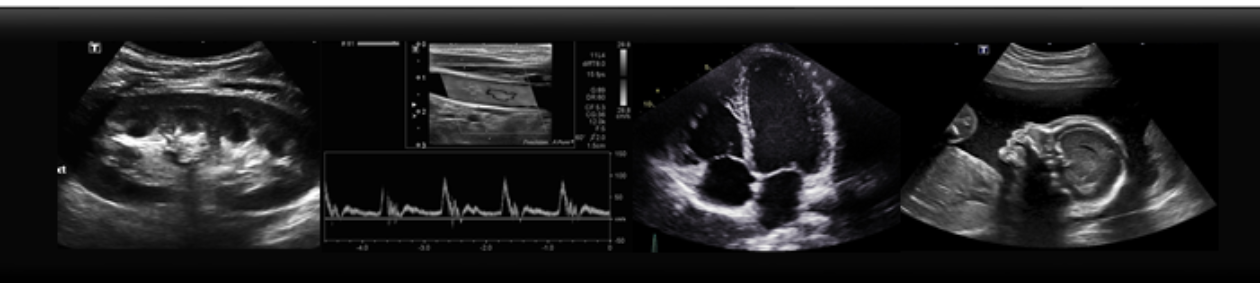
What do Gallstones look like?
Cholecystitis is one of the more common ailments seen in emergency departments, and one of the most frequent indications for an abdominal ultrasound. Gallstones will appear as echogenic, or bright white, round stones within the gallbladder, with shadows posterior. The gallbladder itself will appear anechoic, or black, tubular structure, adjacent to the right lobe of the liver and the main portal vein. When assessing for cholecystitis here are some other sonographic signs:


-Look for mobility. Do the stones roll when you move the patient? Look at the gallbladder supine, stone will be sitting towards the “neck” of the gallbladder, because that is dependent location. Now try tolling your patient LLD, or even sitting up. The stones should roll to the fundus! If not, are they stuck in the neck?

– Is the gallbladder wall thick? Measure the wall in transverse and it should be less than 3 mm

-Is there free fluid? Look for a pointy, “triangle” shaped anechoic area beside the GB.

– Is there a positive Murphy’s Sign? When you apply pressure to the gallbladder, does this correspond with the patient’s area of pain? Often the response is quite clear.
Images courtesy of Radiopedia.org:
Case courtesy of Dr Derek Smith, <a href=”https://radiopaedia.org/”>Radiopaedia.org</a>. From the case <a href=”https://radiopaedia.org/cases/42795″>rID: 42795</a>
Case courtesy of Dr Andrew Dixon, <a href=”https://radiopaedia.org/”>Radiopaedia.org</a>. From the case <a href=”https://radiopaedia.org/cases/9558″>rID: 9558</a>
Case courtesy of RMH Core Conditions, <a href=”https://radiopaedia.org/”>Radiopaedia.org</a>. From the case <a href=”https://radiopaedia.org/cases/38022″>rID: 38022</a>
Case courtesy of Dr M Osama Yonso, <a href=”https://radiopaedia.org/”>Radiopaedia.org</a>. From the case <a href=”https://radiopaedia.org/cases/16769″>rID: 16769</a>
The Gallbladder
It’s Thanksgiving weekend, and what a fitting time to talk about the gallbladder. With the rich meals associated with the holidays, it’s no surprise that the emergency department fills with patients who have biliary tract disorders such as gallstones and cholecystitis.
Here are some tips on how to find the gallbladder on ultrasound. Begin with the patient supine, placing probe sagittally and to the right of mid-line. The image should show liver and the gallbladder. Often a held inspiration can help move obscuring bowel gas. Now often patients do not have a nice supine window, so next view to try is intercostal. Place the probe at right lateral position, scanning between the ribs. Next look at the gallbladder when the patient is in a left lateral decubitus position. Often this is the best view to look at the GB because the liver creates an acoustic window and the bowel moves to the left. Again, place probe subcostally, right of mid-line, and sweep with your probe in the sagittal position.
Below is an ultrasound image of a normal gallbladder. Stay tuned for further posts about gallbladder pathology!

Case courtesy of Dr Henry Knipe, <a href=”https://radiopaedia.org/”>Radiopaedia.org</a>. From the case <a href=”https://radiopaedia.org/cases/48019″>rID: 48019</a>
Assessment is Key!
It cannot be stressed enough that the real shining star of ultrasound is the real-time assessment of a structure; the actual sweeping back and forth through the organ of interest. It can be all too easy for new scanners to focus on finding the organ and taking a picture of it. Don’t forget to sweep through that structure! Here’s a good example: When scanning a kidney in the sagittal plane, plant your probe and angle it side to side. As you sweep through the kidney, assess medial to lateral until you have scanned completely in and out of the kidney. You never know, you might pick up an exophytic cyst on the periphery of the kidney!
Don’t be discouraged if you aren’t getting textbook images at the beginning of your ultrasound journey, it’s the assessment that counts.

Learn to do the easy stuff first
Learn basic ultrasound skills first. Start with the lung, the gallbladder or with free abdominal fluid. Practice on the easy stuff. The science is constantly evolving. New studies demonstrating the value of bedside ultrasound and demonstrating its clinical value get published every month. Don’t wait until a headline grabs your attention and makes you think “I must start doing this” before you start learning. With basic ultrasound skills already learnt, picking up new ones is a cinch.
Select the right probe
When you’re starting out with bedside ultrasound, it’s tempting to save yourself a few seconds and use the probe that’s set as the default probe for whatever you want to scan. This is a rookie error. The reason there are different probes is that any single probe design and its corresponding frequency range represents a series of trade-offs. The biggest trade-off is between resolution and depth of view. The other is between scope (the size and shape of the sound beam) and resolution. For more depth, for example to see the back of the liver, you need a lower-frequency probe but this limits the image resolution or detail that is seen. High-frequency probes are great for detail work, for example with tendons or vessels, but have limited depth of penetration and are therefore limited to superficial structures.
With scope, the wider or more fan-shaped the beam, the lower the resolution. The higher resolution seen with linear beam arrays comes with a smaller lateral field of view or scope.
Therefore when scanning abdomens, use the low-frequency, curved probe (good depth, wide scope, lower detail). When scanning superficial structures such as vessels or for foreign bodies, use the high-frequency, linear probe (shallow depth, high detail, narrow scope). When scanning the heart use the small-footprint, wide-scope probe with the lower frequency. This allows you to get between the ribs (small footprint) and see all the cardiac chambers (greater depth) but does compromise on the detail which is an acceptable tradeoff with cardiac sonography.
Practice needle procedures
Practice your needle procedures on a home-made phantom. You can do it over and over again until you are really good at them and without hurting anyone. This sounds crazy and so very few people do it. Hence, very few get really good at needle guided procedures. This is exactly why you should do this. For a cool video on making a home-made ultrasound phantom for this purpose check out this link from Clarius.
On getting started in bedside ultrasound
Browsing videos on US technique is one thing but there really is no substitute for getting good quality formal teaching and hands-on tuition early on. This provides a framework of basic technique on which to build and improve. There are many courses out there and probably many near you. In British Columbia we have the EDE POCUS course and the HOUSE course out of UBC.
Great video on US physics, artefacts and “knobology”
When you’re starting out, videos can be a great learning resource. This series by Liz Turner is a great starting point. Find the first in the series here.
Optimize your image constantly – Focus
The resolution of the image generated by the ultrasound beam is not the same across all depths. The sound waves emitted from the crystal array in the probe can be focussed electronically at a level of your choosing, which you should adjust to the level of the organ of interest. This maximizes the resolution of the image at that depth. You should alter the focus level continuously during scanning as your target organ changes in depth.
When using ultrasound to guide needles in patients (for example when inserting a central line), set your focus at the level of your needle and not at the level of the target vessel. This will help you see the position of your needle more clearly.