Tag Archives: ultrasound technique

DVT 101

Looking for deep vein thrombosis (DVT) of the lower extremity is a common request. The most important aspect of a DVT ultrasound is the compression of the vein.

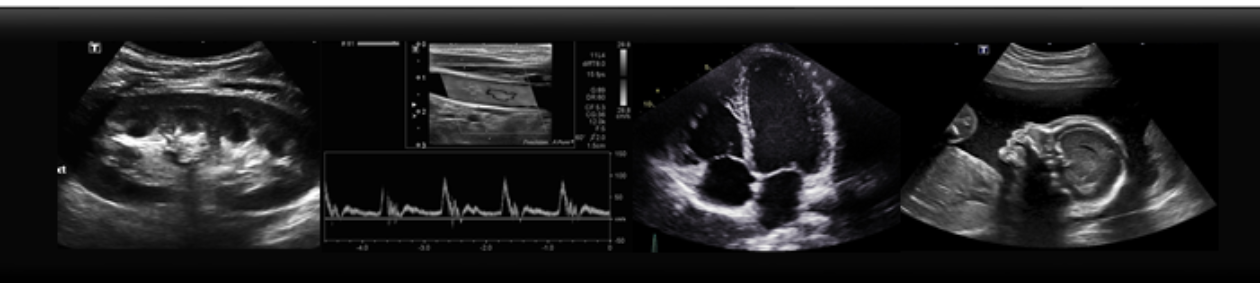
On ultrasound, vessels look black, or anechoic, due to the fact that they are fluid filled. You can also use colour Doppler to see the flow of blood within these vessels.

Holding your probe in transverse on the patient’s leg, find the common femoral artery and vein at the proximal thigh. By applying firm pressure with the probe to the patient, the vein should easily collapse. Follow the vein from the thigh to behind the knee, to the popliteal vein.

sfv-comp-norm.jpg

However, if the vein does not compress, this should raise suspicion for a DVT. Often, you will be able to see clot within the vein, as the vessel is no longer anechoic, but filled with hypoechoic clot. Also, if you turn on colour Doppler there will be no colour flow within the vessel.

DVT +

clot

Images:

http://www.nuemblog.com/dvt

https://radiopaedia.org/cases/lower-limb-deep-venous-thrombosis-dvt

Save

What’s in a name? Different types of ultrasound probes

Types of Probes:

There are three main types of ultrasound probes: curvilinear, linear and phased.

Curvilinear. This is a low frequency probe with a curved face. Typically used for abdominal, gyne, obstetrical and pleural scanning. The curved face gives and increased field of view, while the lower frequency allows for better penetration.

Linear: High frequency probe with a flat, rectangular face. Used for vascular, small parts and musculoskeletal scanning. Due to shape of probe, image is rectangular, not a curved arc. *Tip: Most units have an option to make the image widescreen, increasing the field of view.

Phased: Low Frequency rectangular shaped probe with a small face. Primarily used for cardiac scanning (echocardiography). The small face of the probe allows it to fit between ribs, but the arrangement of crystals creates a curvilinear field of view.

Image Optimization

Depth, Focus, Gain

When it comes to image quality, if you follow these easy steps for every image, you can’t go wrong! First, adjust your depth. Is the structure you are imaging, say the aorta, way at the top of the screen? Decrease your depth so your image ends just below the area of interest. Is the lower pole of the kidney cut off? Increase your depth to include a few centimeters below the kidney border.

Now that you’ve adjusted your depth, apply the focus! By tapping or twisting the focus knob, place your focal zone at or just below the structure of interest. This will place optimal resolution at the organ you want to see.

Finally, tweak the gain. Usually a dial on the main console, twist to increase or decrease the brightness of the image. Your goal: Make anechoic structures, such as vessels or the bladder black, but still bright enough to see surrounding structures.

With these three steps, your images will be picture perfect!

A Field Guide to Bedside Ultrasound – out now

We’re so excited! After a long gestation, our first book is finally out. It’s geared to those starting out in bedside ultrasound and offers a basic grounding in US technique. Concise and pocket-sized, it contains chapters on basic scanning of the most common applications such as scrotum, leg veins, abdomen, OB, lung and cardiac. Packed with tips and tricks it also has a chapter on US guided procedures and what to look for when buying your own machine. It’s available direct from our publisher or from Amazon. E-book versions are also available from iTunes and the Amazon Kindle store. To check it out, click on the link.

The Gallbladder

It’s Thanksgiving weekend, and what a fitting time to talk about the gallbladder. With the rich meals associated with the holidays, it’s no surprise that the emergency department fills with patients who have biliary tract disorders such as gallstones and cholecystitis.

Here are some tips on how to find the gallbladder on ultrasound. Begin with the patient supine, placing probe sagittally and to the right of mid-line. The image should show liver and the gallbladder. Often a held inspiration can help move obscuring bowel gas. Now often patients do not have a nice supine window, so next view to try is intercostal. Place the probe at right lateral position, scanning between the ribs. Next look at the gallbladder when the patient is in a left lateral decubitus position. Often this is the best view to look at the GB because the liver creates an acoustic window and the bowel moves to the left. Again, place probe subcostally, right of mid-line, and sweep with your probe in the sagittal position.

Below is an ultrasound image of a normal gallbladder. Stay tuned for further posts about gallbladder pathology!

normal-upper-abdominal-ultrasound-male-adult

Case courtesy of Dr Henry Knipe, <a href=”https://radiopaedia.org/”>Radiopaedia.org</a>. From the case <a href=”https://radiopaedia.org/cases/48019″>rID: 48019</a>

Select the right probe

When you’re starting out with bedside ultrasound, it’s tempting to save yourself a few seconds and use the probe that’s set as the default probe for whatever you want to scan. This is a rookie error. The reason there are different probes is that any single probe design and its corresponding frequency range represents a series of trade-offs. The biggest trade-off is between resolution and depth of view. The other is between scope (the size and shape of the sound beam) and resolution. For more depth, for example to see the back of the liver, you need a lower-frequency probe but this limits the image resolution or detail that is seen. High-frequency probes are great for detail work, for example with tendons or vessels, but have limited depth of penetration and are therefore limited to superficial structures.

With scope, the wider or more fan-shaped the beam, the lower the resolution. The higher resolution seen with linear beam arrays comes with a smaller lateral field of view or scope.

Therefore when scanning abdomens, use the low-frequency, curved probe (good depth, wide scope, lower detail). When scanning superficial structures such as vessels or for foreign bodies, use the high-frequency, linear probe (shallow depth, high detail, narrow scope). When scanning the heart use the small-footprint, wide-scope probe with the lower frequency. This allows you to get between the ribs (small footprint) and see all the cardiac chambers (greater depth) but does compromise on the detail which is an acceptable tradeoff with cardiac sonography.

Optimize your image constantly – Focus

The resolution of the image generated by the ultrasound beam is not the same across all depths. The sound waves emitted from the crystal array in the probe can be focussed electronically at a level of your choosing, which you should adjust to the level of the organ of interest. This maximizes the resolution of the image at that depth. You should alter the focus level continuously during scanning as your target organ changes in depth.

When using ultrasound to guide needles in patients (for example when inserting a central line), set your focus at the level of your needle and not at the level of the target vessel. This will help you see the position of your needle more clearly.

Optimize your image constantly – Gain

As you scan, structures of interest may dive deep in the body and will appear darker. You should increase the 2D gain control to compensate and keep your image bright enough to see clearly. When the structure becomes more superficial, you may need to decrease the gain to avoid a “white-out” of the structures of interest. Try and maintain your image in the middle of the grey scale to help different structures stand out from one another. This is called “maintaining image contrast”.

Some newer machines have an “auto-optimize” button which automatically adjusts the gain and maintains image contrast. You should push this button regularly during scanning and always after you change the depth of view.

Optimize your image constantly – Depth of view

To get the best image quality, keep adjusting the depth of view as you scan.

As you move the probe over the patient, the organ or structure of interest will be constantly varying in depth on the screen and you want to keep this structure filling as much of the screen as possible to help you see the detail. Setting the depth too large results in shrinking the target structure to a small strip at the top of the screen while the lower screen displays useless information. Try getting into the habit of maximizing your screen resolution by filling your screen with the target.